A villa interior is categorically different from an apartment project — not just in scale, but in how design decisions propagate across floors, connect indoor and outdoor spaces, and demand architectural thinking from the first consultation. The families who navigate a villa interior well are the ones who plan in floors, not rooms.
Think in Floors, Not Rooms
The most common mistake in villa interior planning is treating each floor as a separate apartment. This approach produces homes that feel disconnected — as if three different designers worked independently on three different floors. The result is spatial incoherence: warm wood tones on the ground floor, cool marble on the first, and a staircase that doesn't know which vocabulary it belongs to.
The correct frame is: the villa is a single home that happens to occupy multiple levels. Each floor has a distinct character — the ground floor is public, social, and expressive; the first floor is residential, private, and restful; any additional floors are the most intimate spaces — but all floors share a material and colour language. They're chapters in the same book, not different books.
This means making foundational decisions early: What is the primary flooring material family? What is the dominant wood tone — warm honey or deep walnut? What ceiling treatment philosophy runs through the building? These anchors, established in the design brief before a single drawing is made, prevent the floor-by-floor disconnection that plagues unreferenced villa interiors.
Material Continuity: The Binding Element
Material continuity does not mean identical materials on every floor. It means that materials on different floors are drawn from the same family and speak to each other.
A natural stone on the ground floor entrance — perhaps a warm beige limestone or a grey basalt — doesn't need to continue to the master bedroom. But the warm beige undertone introduced by that limestone should reappear in the first floor corridor wall tone, or in the upholstery fabric selected for the landing seating. The home builds a visual thread rather than starting over at every level change.
Flooring transitions are a specific challenge. Where the ground floor material meets the staircase, and where the staircase meets the first floor, are the most scrutinised transitions in any villa. Design these as deliberate moments — a threshold material change with a border treatment, or a consistent stair tread material that links both levels. These transitions, resolved well, elevate the entire property.
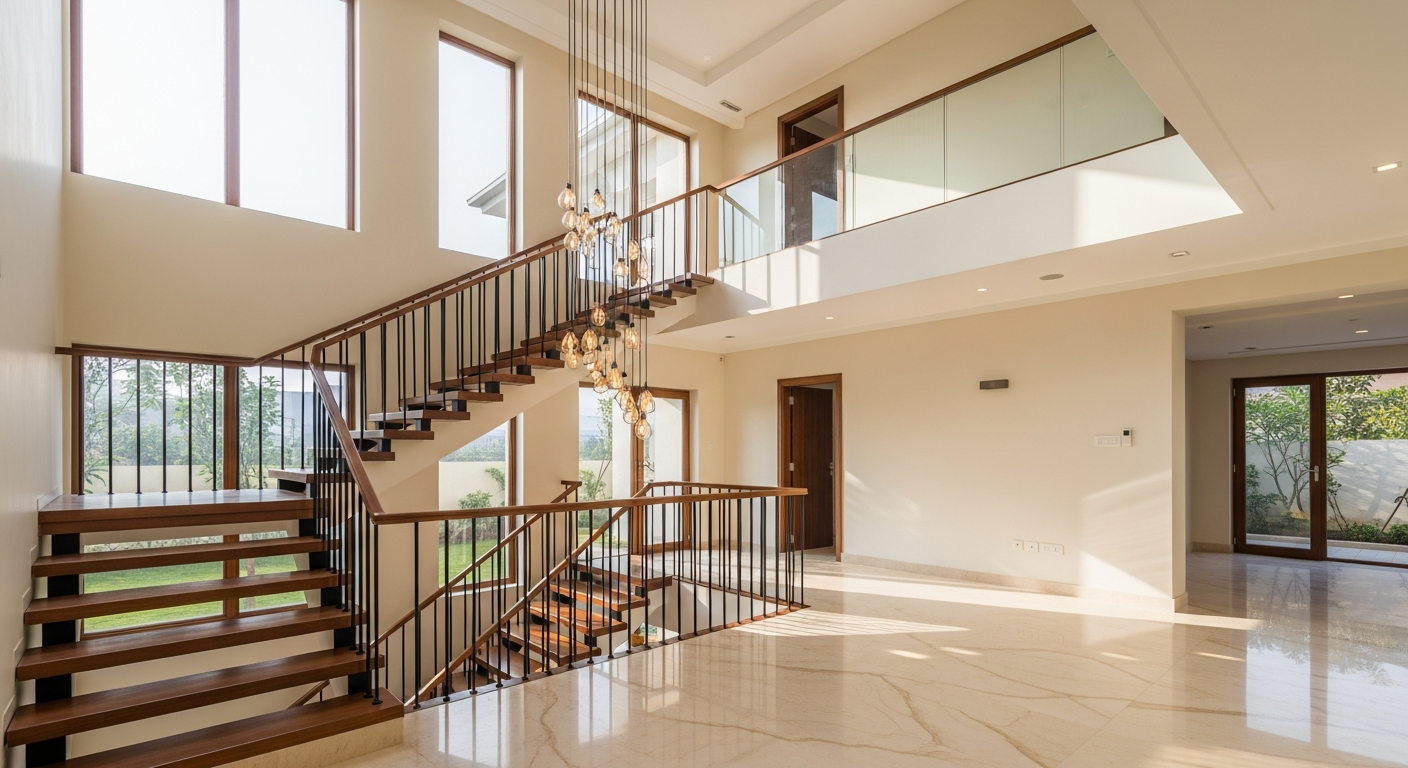
The Staircase as a Feature, Not a Connector
In a villa, the staircase is seen from the entrance, from the living room, and from the first floor landing. It occupies significant vertical height and horizontal span. Treating it as infrastructure — a functional element to be finished in the cheapest available stone — is the single biggest missed opportunity in villa interior design.
The staircase should be designed as a sculptural element: the railing profile (glass panel, metal rod, fabricated metal with a wood handrail), the tread material (natural stone, engineered wood, stained concrete), the soffit treatment under the stair (cladded, plastered, illuminated), and the wall beside the stair (a continuous art wall, a vertical garden, a material feature) together form the spine of the home's interior character.
This doesn't require extravagant cost. A clean, well-proportioned glass panel railing with a solid wood handrail and stone treads, positioned against a warmly lit alcove, creates an architectural statement that elevates the perception of the entire villa.
Scale the Kitchen to the Home
Villa kitchens are rarely compact. A 2,800–4,500 sq ft home typically has a kitchen of 200–350 sq ft, and in many cases the kitchen opens to a utility area, a breakfast counter, and a dining zone. This is not a 2BHK L-shaped kitchen — it's a kitchen that can accommodate an island counter, full-height pantry units, and a professional-grade cooking station.
Designing a villa kitchen at apartment scale — fitting the same number of modules into the available space — produces a kitchen that looks sparse and under-designed. Scale the kitchen to the home: full-height upper cabinets, extended working surface, an island if the layout permits, and ceiling-height pantry storage. The kitchen in a villa signals the entire home's quality tier.
Indoor-Outdoor Transitions
Bangalore's climate allows for genuine indoor-outdoor living — a luxury that apartment residents rarely experience. Most villa projects include a garden, a courtyard, a terrace, or at minimum a landscaped front approach. The interior design must acknowledge and integrate these spaces.
The most effective technique is flooring continuity across the threshold: the same material (or a close relative) used just inside the door and just outside, with only a slight texture change to manage weathering. Where this isn't practical, a covered transition — a deep-eave porch or a covered sit-out — serves as the buffer between interior and exterior materials.
Similarly, the living room furniture arrangement in a villa should be oriented to acknowledge the garden or courtyard view where one exists. A living room that turns its back on an outdoor space misses a defining feature of the property.
Plan the Timeline Around Your Life
A villa interior project of 2,800–4,500 sq ft runs 65–85 days from BOQ sign-off to handover. This is longer than an apartment project, and it typically spans school terms, family schedules, and potentially a monsoon season. Planning the timeline deliberately — starting production in the dry months, scheduling the final installation phase when family members aren't travelling — avoids the pressure of rushing the final stages.
The strongest recommendation for villa owners: engage the interior designer during the final 2–3 months of civil construction. Decisions about slab heights, electrical positions, plumbing rough-ins, and false ceiling anchor points are infinitely easier to make on a live construction site than after possession. A designer involved early shapes these decisions and eliminates the rework that costs both time and money later.
Planning a villa interior in Bangalore? Let's start with a site visit.
Frequently Asked Questions
A 2,800–4,500 sq ft villa interior project in Bangalore typically runs 65–85 days from BOQ sign-off to handover. The timeline depends on scope complexity, number of floors, material availability, and site access. Starting the interior planning process during the final stages of civil construction can meaningfully compress the overall timeline.
Not necessarily. Continuity matters more than uniformity. A common approach: a statement material (such as natural stone or large-format tiles) on the ground floor public spaces, transitioning to warmer flooring (engineered wood, wood-look vinyl) on upper residential floors. The staircase treatment is what unifies both. Abrupt, unrelated material changes on each floor feel disjointed; thoughtful transitions feel deliberate.
The ideal time to engage an interior designer for a villa is during the final 2–3 months of civil construction — before flooring, wiring final positions, and false ceiling heights are locked. Design decisions made at this stage (slab heights, electrical routing, plumbing positions) are difficult or expensive to reverse once civil work is complete. Early engagement means zero rework.